RetroPie Images, SD card Setup, RetroPie FAQs
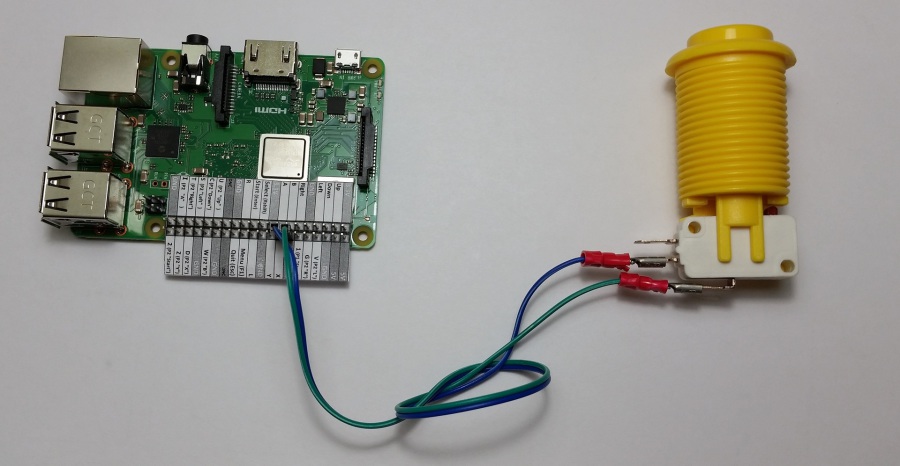
The Porta Pi Arcade runs on RetroPie with Retrogame and some altered config files best for the Porta Pi Arcade. This gives it the function and feel of a true mini arcade. The biggest change from the raw Retropie image is Retrogame which enables the GPIO's to accept inputs and the RPi see's them as keyboard inputs. Retrogame is coded by Adafruit.
The OS images below have Retrogame+Retropie in a turn-key setup meant for GPIO arcade setups, like the Porta Pi Arcade.
RetroPie and Retrogame credit goes to their respective authors and contributors, not me.
Download the image below to try it for yourself. If you like the image, please considering purchasing a kit to make the most out of it. Also consider donating to RetroPie.org. They rock.
And remember: I, nor Retro Built Games provides any warrenty or guarantee for this software. Use at your own risk.
Notes:
- Rasbian/Pixel is NOT installed on any of these images (but you can easily add it).
- If you have questions that are not answered in my RetroPie FAQs, Please see the RetroPie Forums for help.
Downloads:
RetroPie V4.4 for Pi2/ 3 /3+ (w/ Retrogame)
Pi 1 images are no longer supported by me.
Troubleshooting: If you have issues with an image please consult the help sections to attempt a solution. Emailing me with "___ does't work" won't warrent a reply. I'd love to help everyone, but I cannot.
The best place to find solutions is the at the Retropie Forums
How to install/ mount the image:
For Windows Users:
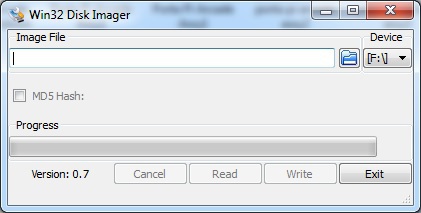
You will need Win32DiskImager to mount the image. You should download it.
Use an 8GB SD card or larger. Some 4GB SD cards will work (SanDisk, but some brands have slightly smaller amount of sectors making their 4GB just a tiny bit smaller (Kingston for example) than my 4GB image. My image was made on a 4GB Sandisk btw.
If you're using an SD that was previously used for something else (it's not fresh out of the package) I HIGHLY reccomend formatting it before mounting the image. When I say format, I mean more than just the Quick Format untility in Windows. You need to overrwite each sector to clear out any residiual data. This also helps fix issues when re-installing/ overwriting Raspberry Pi images on top of eachother- in case one image becomes corrupted or unstable and you install the same vanilla image (reformat for best results).
If using a brand-new SD card, skip these two steps.
A) Download/install SD Formatter tool.
B) Format using the Options: FULL=Overwrite and ADJUST SIZE = ON

Depending on the size and class of the SD card (class 4=slow, class 10=fast), the format may take 5-20+ minutes. When the format is complete, open Win32 Disk Imager.
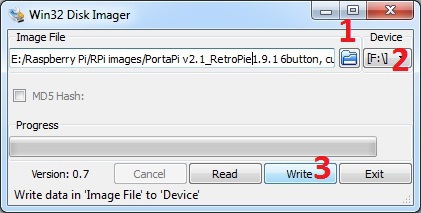
1) Select the image (Porta Piv2.1 in this case) you want to write to the SD card. (if you downloaded the image unzip it first).
2) Select the device/ drive letter, (this is the USB SD card reader with SD card plugged in). Make absolutely sure this the correct drive letter. If you have an external
HDD plugged in and select it accidently, all its data will be forever lost if you continue.
3) Click "Write". Unplug the device when it's complete ( it will take some time- enough time to make a sandwich). You now have a bootable SD card for your Raspberry
Pi!
Insert the SD card into your RPi and plug in power. You will see the raspberry Pi Boot into Emulationstation.
With your RPi powered on and booted, you will be prompted to configure an input device like your keyboard. Do this now. For this class we are going to use the following for navigation (you can change this at a later time):
Keyboard Key Function
Up (Arrow)........ Up
Down (Arrow).... Down
Left (Arrow)....... Left
Right (Arrow)..... Right
Enter ..................Start/Menu
R Shift ................Select
A ........................Accept
B ........................Back
You should be able to navigate left and right between the emulators that are shown. What you are seeing now is called a “front end” or a fancy GUI to launch the emulators pre-installed on the backbone of the operating system (Rasbian). Emulation Station lets the user select any emulator + game on the Pi and opens it with a clean menu selection- much easier than navigating the directories of Rasbian to launch each emulator. “Where are the other systems?” The other emulators only populate when there is a rom file in their respective folder.
Well, those are the basics. Check out my videos and FAQs that lead to more advanced topics. And if you want answers to all your questions, see the forums at petrockblock.com
Links to other guides on the site:
Retro Pie FAQs (Setup and Config)
This page had been updated for RetroPie V3.0 (Ryan updated this Sept 29 2015)
Q. How do I configure advanced options for RetroPie?
A. The main configuration is a setup script. This is for advanced users only. In the terminal type:
cd /home/pi/RetroPie-Setup
sudo ./retropie_setup.sh
Follow the on screen prompts to configure advanced settings.
Q. How do I rotate the screen?
A. sudo nano /boot/config.txt
add the following line
display_rotate=#
where # does the following:
0 no rotation
1 rotate 90 degrees clockwise
2 rotate 180 degrees clockwise
3 rotate 270 degrees clockwise
0x10000 horizontal flip
0x20000 vertical flip
Q. How do I map the controls for MAME?
A. Load a MAME rom, press TAB on your keyboard.
Q. How do I configure the controls for the GBA (Gameboy Advance)?
A. Load a GBA rom, press F10 on your keyboard.
Q. How do I change the order of the emulators? (Where is es_systems.cfg)
A. cd /etc/emulationstation/
sudo nano es_systems.cfg
Select the group of the text related to the emulator. Cut and paste it above or below other systems. This will change the order in emulationstation.
To remove emulators from the list, comment them out using:
<!--
-->
Q. How do I map the controls for the other emulators? (Where is retroarch.cfg)
A. cd /opt/retropie/configs/all/
sudo nano retroarch.cfg
Q. Where is the Rpi's boot config text file? How do I edit it?
A. In terminal type "sudo nano /boot/config.txt"
Q. How do I map my USB joystick?
A. The GUI option is located in EmulationStation.
Q. Where is the master rom folder?
A. /home/pi/RetroPie/roms
Q. What is the default login/password?
A. login:pi password:raspberry
Q. What emulators on are on RetroPie?
A. Note: The Raspberry Pi is not capable of emulating all these systems at 100% normal speed.
Amiga (UAE4All)
Apple II (LinApple)
Apple Macintosh (Basilisk II)
Armstrad CPC (CPC4RPi)
Arcade (PiFBA, Mame4All-RPi)
Atari 800
Atari 2600 (RetroArch)
Atari ST/STE/TT/Falcon
C64 (VICE)
CaveStory (NXEngine)
Doom (RetroArch)
Duke Nukem 3D
Final Burn Alpha (RetroArch)
Game Boy Advance (gpSP)
Game Boy Color (RetroArch)
Game Gear (Osmose)
Intellivision (RetroArch)
MAME (RetroArch)
MAME (AdvMAME)
NeoGeo (GnGeo)
NeoGeo (Genesis-GX, RetroArch)
Sega Master System (Osmose)
Sega Megadrive/Genesis (DGEN, Picodrive)
Sega Mega-CD (Picodrive)
Sega 32X (Picodrive)
Nintendo Entertainment System (RetroArch)
N64 (Mupen64Plus-RPi)
PC Engine / Turbo Grafx 16 (RetroArch)
Playstation 1 (RetroArch)
ScummVM
Super Nintendo Entertainment System (RetroArch, PiSNES, SNES-Rpi)
Sinclair ZX Spectrum (Fuse)
PC / x86 (rpix86)
Z Machine emulator (Frot)
Q. How do I move/ copy ROMs?
A. Guide here
Q. How do I Adjust the Rpi's volume output?
A. Type "alsamixer" in terminal. Follow instructions.
Q. How I do Copy/Paste/Move files in terminal?
A. See here
Q. Where does ___ bios go?
A. Ususally in the resepctive ROM folder. See petrockblock.com forums for details
Q. What is done to a vanilla RetroPie image (v 2.6- 3.0) to make it work with a Porta Pi Arcade setup? retrogame.c support in RetroPie v2.3 and up.
Lots of stuff. See all the Q's below.
Q. How do you make the arcade controls work with GPIO?
A. Retrogame and once you download it, this is what I change for the Porta Pi Arcade.
Q. How do I install Retrogame?
A. Guide here
Q. What other Customization is done with RetroPie v3.0 to work well with the Porta Pi Arcade?
A. Here's a brief list:
alsamixer set to 80db
sudo raspi-config
Force Analog Audio Out (or set to Auto)
cd /opt/retropie/configs/all/
sudo nano retroarch.cfg
Changes made:
video_shader_enable=false
video_aspect_ratio=1.77 (edit, should be 1.60 for the 10.1" LCD. oops)
input_max_users=4
config_save_on_exit=true (optional)
input_exit_emualtor=escape
#input_reset=b
input_menu_toggle=f1
#input_enable_hotkey=rshift
#input_state_slot_increase = right
#input_state_slot_decrease = left
video_shader_enable = false (not done, recommended if you like sharp pixels)
video_smooth = false (recommended if you like sharp pixels)
Video Resolution, Ratio, Output Mode Details
Output VGA through HDMI :
You will need a VGA adapter for this.
Plug your raspberry Pi SD card into a windows PC. Open the config.txt file in a text or code editor (like notepad++).
You can also edit this file directly from the RPi...in the terminal window type:
sudo nano /boot/config.txt
The following will force a specific HDMI mode (this will force VGA)
hdmi_group=2
hdmi_mode=16
If hdmi display is not detected and composite is being output
#hdmi_force_hotplug=1
# Put your VGA monitor resolution below
# hdmi_cvt = <width height> <framerate> <aspect> <margins> <interlace> <rb>
# width width in pixels
# height height in pixels
# framerate framerate in Hz (50 or 60 is common for PAL or NTSC)
# aspect aspect ratio 1=4:3, 2=14:9, 3=16:9, 4=5:4, 5=16:10, 6=15:9
# margins 0=margins disabled, 1=margins enabled
# interlace 0=progressive, 1=interlaced
# rb 0=normal, 1=reduced blanking
# For example, 800x600 @ 60 Hz with a 4:3 ratio hdmi_cvt=800 600 60 1 0 0 1
# or maybe 800x480 @ 60 Hz hdmi_cvt=800 480 60 1 0 0 1
# or, 1024 x 768 @ 60 Hz with a 15:9 ratio hdmi_cvt=1024 768 60 6 0 0 1
# or if you're not sure, nothing beats 640x480 hdmi_cvt=640 460 60 1 0 0 1
Also handy:
### The following line will enable analog audio out ###
hdmi_drive=2
Composite Video Output Settings
These composite video cables are not all the same. For the RPi, use a cable that has this pinout.
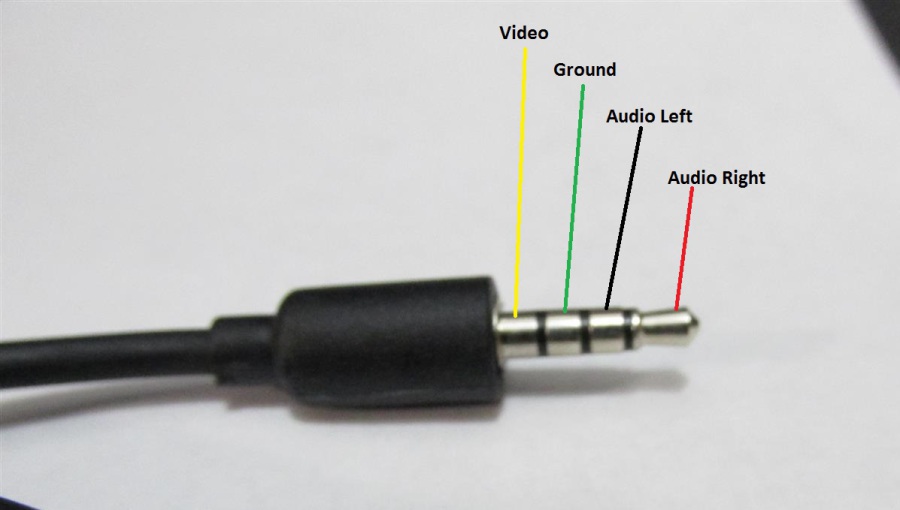
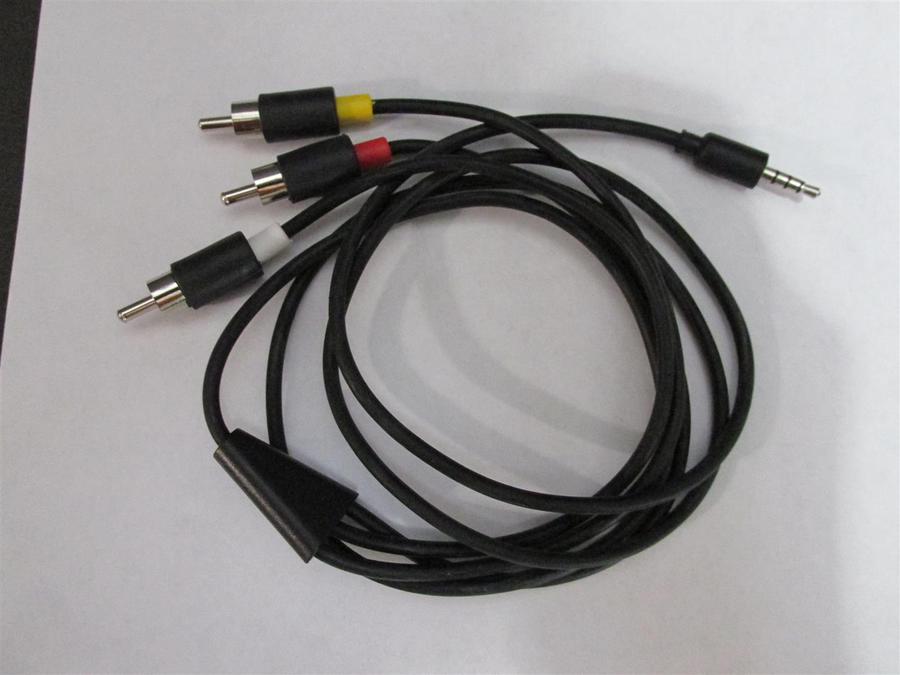
If you hook your raspberry pi up to an old TV via Composite video, you are getting the true feel of a retro setup. However, the Pi can have trouble matching the aspect ratio of your tv. To fix this edit the following in the config.txt (remember sudo nano /boot/config.txt)
To fix the screen size in pixels for a SD TV change;
#framebuffer_width=1280
#framebuffer_height=720
to the following (be sure to uncomment the lines):
framebuffer_width=640
framebuffer_height=480
Finally, the GBA emulator uses a different script to output its screen size. Most of the time the horizonal (width) resolution does not fit a SD TV. Add this line to config.txt to fix the issue.
overscan_scale=1
© 2013-2023 Ryan Bates and © 2013-2023 Retro Built Games, LLC. All photos, designs, documents, and graphics (C) Ryan Bates. All Rights Reserved.
This site is best viewed on a desktop PC. Raspberry Pi is a trademark of the Raspberry Pi Foundation. ARDUINO® and other Arduino brands and logos published in the website are Trademarks of Arduino AG.