ProMicro Macro Keyboard Ver2.0
Now with more RGB!
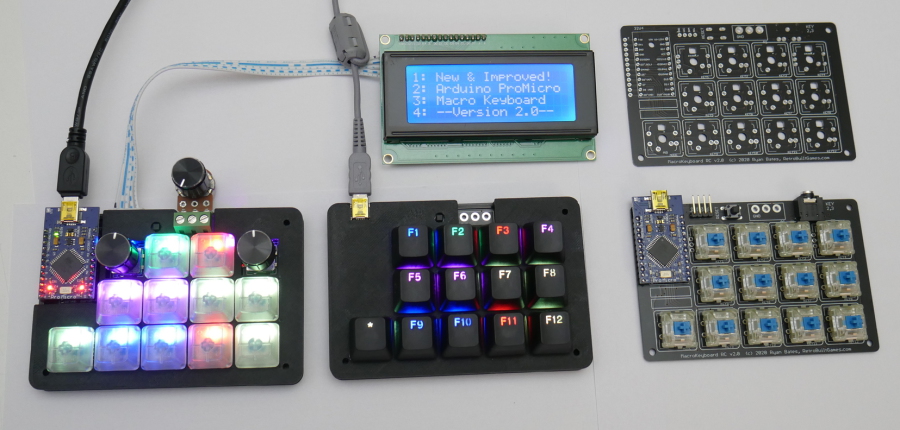
Helpful for brainstorming your macros.
MacroKeyboard v2.0 Key Template Layout.p[...]
Adobe Acrobat document [41.2 KB]
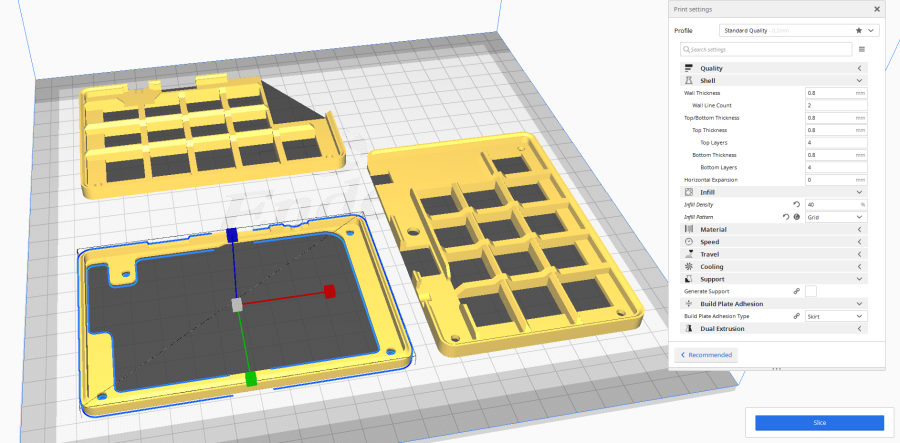
3D Print files for case/ enclosure (only fits proMicro with mini USB)
Shell is two parts, top and bottom. The Top has two variations: Cutout for the ProMicro (miniUSB header) when using taller removable headers,
or NoCutout if soldering directly to the PCB.
3MF Print Files Case Macro Keyboard RC V[...]
Compressed file archive [144.5 KB]
SolidWorks Design Files
SolidWorks 2019-2020 version (or newer) required
SolidWorks CAD Model Macro Keyboard RC V[...]
Compressed file archive [1.7 MB]
Stream Deck Plans!
(The poor people's version)
These are the vector design files meant for a laser cutter. Will hold the keyboard and a 4x20 LCD (or whatever if you modify files) together in a purpose-built stand. Both the Mini Macrokeyboard and full size V2.0 variations are in this file. Note the short versus tall variations are for if you solder your pro micro directly to the board or use headers respectively; the extra height is needed to clear the USB plug.
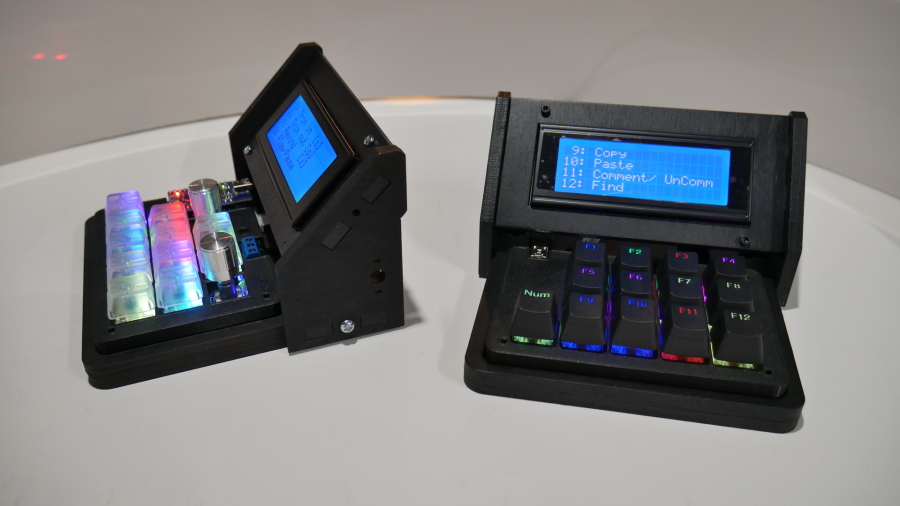
Laser cut files. Fits Mini Macro and Macro Keyboard v2.0
MacroKeyboard Stream Deck plans.rar
Compressed file archive [25.6 KB]
Trouble Shooting Tips and FAQs
Some basic trouble shooting:
- This PCB is not plug-and-play. You have to upload at least the example code linked from this product description. Code is on this page.
- Use the Arduino IDE to program. (see arduino.cc for help with adding libraries and getting the software to program the Arduino).
- Make sure you have these libraries added:
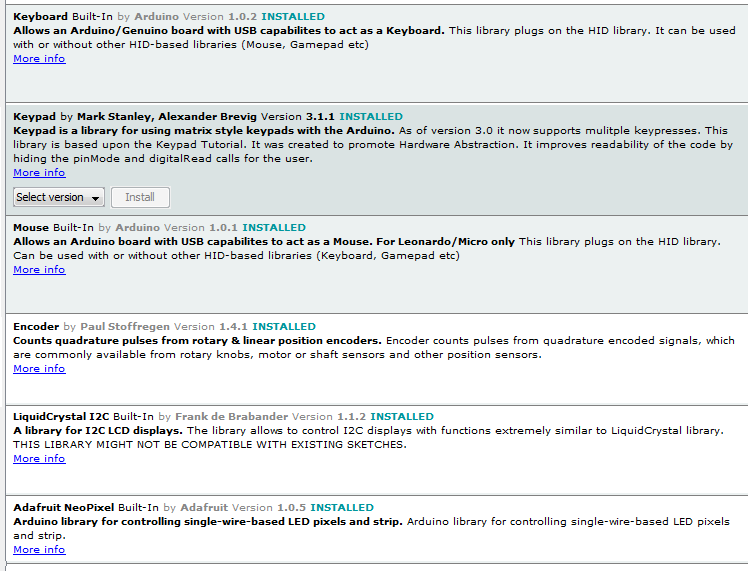
Go to Tools>Manage Libraries.
Search for these libraries. When you find the library listed below, install it.
4. Make sure the Arduino Micro 32u4 is selected when programming this board. Tools> Board> Arduino Micro.
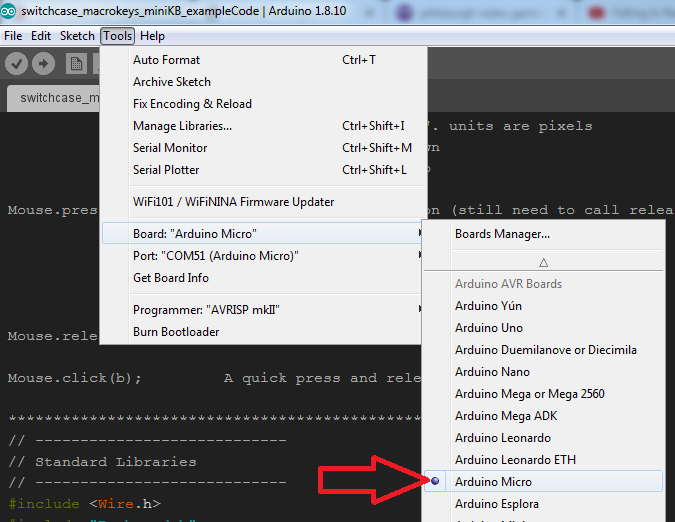
2) Make sure you have the Arduino Pro Micro selected. Tools> Board> Arduino Micro
5. Make sure all the solder jumpers are soldered! You’ll get really weird results (phantom keys) if you miss a jumper.
6. You may have to hold down the reset button, hit upload sketch, wait for the IDE to try to ‘upload’ to the Arduino, then release the reset button.
The boot-loader for uploading is a short window in the Arduino Pro Micro. The Pro Micro wants to default to the USB HID mode. Catching the short window for uploading a program might take a few tries;
i.e to get a feel for the timing (my experience).
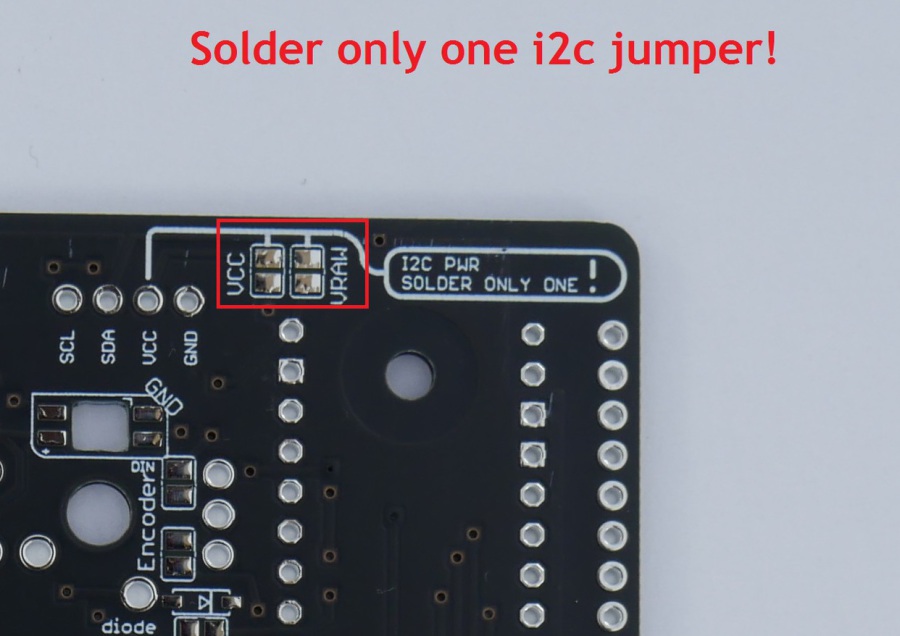
7. DO NOT SOLDER BOTH I2C power jumpers. Solder only one!
Example Code: EXPERT Macros, LCD and RGB LED support.
switchcase_macrokeys_RGB_NeoPixelsV2_Exp[...]
Compressed archive in ZIP format [10.3 KB]
Example Code: Simple Macros, LCD and RGB LED support.
/*******************************************************************
* RYAN UPDATE THIS (MAYBE LATER ITS DEC 24 AND I JUST GOT THE VIDEO DONE)
* A multi-mode Macro keyboard with Arduino Pro Micro using row column matrix.
* This is a basic sketch to understand key layout, basic hotkeys macros and some extras like:
* -RBG addressble LEDs compatible with Adafruit's neopixel library.
* -i2c for 4x20 LCD to describe each function. (you might have a different LCD...)
* -mouse movement + mouse clicks.
*Some mouse movement (in pixels) pull their values from analogRead(pin 0) so make sure something is connected.
*Don't forget to solder all the diode and encoder solder jumpers on the backside!!
* (c) 2020 Ryan Bates
Last time I touched this: Dec 13 2020
web: www.retrobuiltgames.com
youtube: https://www.youtube.com/c/ryanbatesrbg
twitter: @retrobuiltgames
Buy this PCB at https://www.tindie.com/products/19957/
Ryan's Pro Tips:
=============== Keyboard Control================================================================================
Keyboard.write(); Sends a keystroke to a connected computer.
This is similar to pressing and releasing a key on your keyboard.
Will send a shift command if applicable. Example: Keyboard.write('K') will
automatically do SHIFT + k.
Can also accept ASCII code like this:
//Keyboard.write(32); // This is space bar (in decimal)
Helpful list of ASCII + decimal keys http://www.asciitable.com/
Keyboard.press(); Best for holding down a key with multi-key commands; like copy/ paste
This example is [ctrl] + [shift] + [e]
//Keyboard.press(KEY_LEFT_CTRL);
//Keyboard.press(KEY_LEFT_SHIFT);
//Keyboard.press('e');
//delay(100); Keyboard.releaseAll();
Keyboard.print(); Sends a keystroke(s)
Keyboard.print("stop using aim bot"); // types this in as a char or int! (not a string)!
Keyboard.println(); Sends a keystroke followed by a newline (carriage return)
Very practical if you want to type a password and login in one button press!
SOMETIMES, applications are coded to recognize Keyboard.press() and not Keyboard.write() and vice versa.
You might have to experiment.
=============== Mouse Control================================================================================
Mouse.move(x, y, wheel); Moves the mouse and or scroll wheel up/down left/right.
Range is -128 to +127. units are pixels
-number = left or down
+number = right or up
Mouse.press(b); Presses the mouse button (still need to call release). Replace "b" with:
MOUSE_LEFT //Left Mouse button
MOUSE_RIGHT //Right Mouse button
MOUSE_MIDDLE //Middle mouse button
MOUSE_ALL //All three mouse buttons
Mouse.release(b); Releases the mouse button.
Mouse.click(b); A quick press and release.
**********************************************************************************************************/
// --------------------------------------------------------------
// Standard Libraries
// --------------------------------------------------------------
#include "Keyboard.h"
// Library with a lot of the HID definitions and methods
// Can be useful to take a look at it see whats available
// https://github.com/arduino-libraries/Keyboard/blob/master/src/Keyboard.h
#include <Mouse.h> //there are some mouse move functions for encoder_Mode 2 and 3
#include <Keypad.h>
// This library is for interfacing with the 3x4 Matrix
// Can be installed from the library manager, search for "keypad"
// and install the one by Mark Stanley and Alexander Brevig
// https://playground.arduino.cc/Code/Keypad/
const byte ROWS = 3; //four rows
const byte COLS = 4; //four columns
#include <Encoder.h>
//Library for simple interfacing with encoders (up to two)
//low performance ender response, pins do not have interrupts
Encoder RotaryEncoderA(14, 15); //the LEFT encoder (encoder A)
Encoder RotaryEncoderB(10, 16); //the RIGHT encoder (encoder B)
// --------------------------------------------------------------
// Additional Libraries - each one of these will need to be installed to use the special features like i2c LCD and RGB LEDs.
// --------------------------------------------------------------
#include <LiquidCrystal_I2C.h>
LiquidCrystal_I2C lcd(0x3F, 20, 4); // set the LCD address for a 40 chars and 4 line display
// Your LCD hardware address or type might be different... This LCD library might not work for your application
const int LCD_NB_ROWS = 4 ; //for the 4x20 LCD lcd.begin(), but i think this is kinda redundant
const int LCD_NB_COLUMNS = 20 ;
unsigned long previousMillis = 0; // values to compare last time interval was checked (For LCD refreshing)
int check_State = 0; // state to check trigger the demo interrupt
int updateLCD_flag = 0; // LCD updater, this flag is used to only update the screen once between mode changes
// and once every 3 second while in a mode. Saves cycles / resources
#include <Adafruit_NeoPixel.h> //inclusion of Adafruit's NeoPixel (RBG addressable LED) library
#ifdef __AVR__
#include <avr/power.h>
#endif
#define PIN A2 // Which pin on the Arduino is connected to the NeoPixels?
#define NUMPIXELS 13 // How many NeoPixels are attached to the Arduino? 13 total, but they are address from 0,1,2,...12.
// When we setup the NeoPixel library, we tell it how many pixels, and which pin to use to send signals.
// Note that for older NeoPixel strips you might need to change the third parameter--see the strandtest
// example for more information on possible values.
Adafruit_NeoPixel pixels = Adafruit_NeoPixel(NUMPIXELS, PIN, NEO_GRB + NEO_KHZ800);
int colorUpdate = 0; //setting a flag to only update colors once when the mode is switched.
const int b = 3; // Brightness control variable. Used to divide the RBG vales set for the RGB LEDs. full range is 0-255. 255 is super bright
// In fact 255 is obnoxiously bright, so this use this variable to reduce the value. It also reduces the current draw on the USB
char keys[ROWS][COLS] = {
{'1', '2', '3', '4'}, // the keyboard hardware is a 3x4 grid...
{'5', '6', '7', '8'},
{'9', '0', 'A', 'B'}, // these values need to be single char, so...
};
// The library will return the character inside this array when the appropriate
// button is pressed then look for that case statement. This is the key assignment lookup table.
// Layout(key/button order) looks like this
// |----------------------------|
// | [2/3]* | *TRS breakout connection. Keys 5 and 6 are duplicated at the TRS jack
// | [ 1] [ 2] [ 3] [ 4] | * Encoder A location = key[1]
// | [ 5] [ 6] [ 7] [ 8] | * Encoder B location = Key[4]
// | [ 9] [10] [11] [12] | NOTE: The mode button is not row/column key, it's directly wired to A0!!
// |----------------------------|
// Variables that will change:
int modePushCounter = 0; // counter for the number of button presses
int buttonState = 0; // current state of the button
int lastButtonState = 0; // previous state of the button
int mouseMove;
long positionEncoderA = -999; //encoderA LEFT position variable
long positionEncoderB = -999; //encoderB RIGHT position variable
const int ModeButton = A0; // the pin that the Modebutton is attached to
const int pot = A1; // pot for adjusting attract mode demoTime or mouseMouse pixel value
//const int Mode1= A2;
//const int Mode2= A3; //Mode status LEDs
byte rowPins[ROWS] = {4, 5, A3 }; //connect to the row pinouts of the keypad
byte colPins[COLS] = {6, 7, 8, 9 }; //connect to the column pinouts of the keypad
Keypad keypad = Keypad( makeKeymap(keys), rowPins, colPins, ROWS, COLS );
void setup() {
lcd.init(); //initialize the 4x20 lcd
lcd.backlight(); //turn on the backlight
lcd.begin(LCD_NB_COLUMNS , LCD_NB_ROWS);
pinMode(ModeButton, INPUT_PULLUP); // initialize the button pin as a input:
Serial.begin(9600); // initialize serial communication:
lcd.setCursor(0, 0); lcd.print("Macro KB RC V2.0");
lcd.setCursor(0, 1); lcd.print("(c) 2020 Ryan Bates");
delay(800);
lcd.clear();
Serial.begin(9600);
Keyboard.begin();
pixels.begin(); // This initializes the NeoPixel library.
}
void loop() {
char key = keypad.getKey();
mouseMove = (analogRead(pot)); //reading the analog input, pot = pin A1
mouseMove = map(mouseMove, 0,1023, 1,124); //remap the analog pot values fron 1 to 124
checkModeButton();
switch (modePushCounter) { // switch between keyboard configurations:
case 0: //Application Alpha or MODE 0. Example = Every button ends your Zoom call
encoderA_Mode0(); //custom function for encoder A
encoderB_Mode0(); //custom function for encoder A
LCD_update_0(); //Mode 0 text for LCD
setColorsMode0(); //indicate what mode is loaded by changing the key colors
if (key) {
Serial.println(key);
switch (key) {
case '1': endZoomCall(); break;
case '2': endZoomCall(); break;
case '3': endZoomCall(); break;
case '4': endZoomCall(); break;
case '5': endZoomCall(); break;
case '6': endZoomCall(); break;
case '7': endZoomCall(); break;
case '8': endZoomCall(); break;
case '9': endZoomCall(); break;
case '0': endZoomCall(); break;
case 'A': endZoomCall(); break;
case 'B': endZoomCall(); break;
}
delay(100); Keyboard.releaseAll(); // this releases the buttons
}
break;
case 1: // Application Beta or MODE 1 Rocket League Quick Chat (with light reactive keys)
encoderA_Mode2(); //move mouse
encoderB_Mode2(); //Beta key4move mouse
setColorsMode1();
LCD_update_1(); //Mode 1 text for LCD
if (key) {
//Serial.println(key);
switch (key) {
case '1': Keyboard.println("nice shot");
pixels.setPixelColor(1, pixels.Color(0,150,0)); // change the color to green when pressed, wait 100ms so the change can be observed
break;
case '2': Keyboard.println("great pass");
pixels.setPixelColor(2, pixels.Color(0,150,0));
break;
case '3': Keyboard.println("great save");
pixels.setPixelColor(3, pixels.Color(0,150,0));
break;
case '4': Keyboard.println("thanks");
pixels.setPixelColor(4, pixels.Color(0,150,0));
break;
case '5': Keyboard.println("i got it");
pixels.setPixelColor(5, pixels.Color(0,150,0));
break;
case '6': Keyboard.println("take the shot");
pixels.setPixelColor(6, pixels.Color(0,150,0));
break;
case '7': Keyboard.println("defending");
pixels.setPixelColor(7, pixels.Color(0,150,0));
break;
case '8': Keyboard.println("go for it");
pixels.setPixelColor(8, pixels.Color(0,150,0));
break;
case '9': Keyboard.println("oh no!");
pixels.setPixelColor(9, pixels.Color(0,150,0));
break;
case '0': Keyboard.println("no problem");
pixels.setPixelColor(10, pixels.Color(0,150,0));
break;
case 'A': Keyboard.println("whoops");
pixels.setPixelColor(11, pixels.Color(0,150,0));
break;
case 'B': Keyboard.println("#@!%*");
pixels.setPixelColor(12, pixels.Color(0,150,0));
break;
}
pixels.show(); //update the color after the button press
delay(100); Keyboard.releaseAll(); // this releases the buttons
//delay(100); //delay a bit to hold the color (optional)
colorUpdate = 0; //call the color update to change the color back to Mode settings
}
break;
//====================================================================================================================
case 2: // Application Delta (some basic Arduino IDE Shortcuts and HotKeys)
encoderA_Mode1(); // tab or shift+tab on the encoder rotation
encoderB_Mode1(); // + or - on the encoder rotation
LCD_update_2(); // Mode 2 text for LCD
setColorsMode2(); // set color layout for this mode
if (key) {
//Serial.println(key);
switch (key) {
case '1': Keyboard.press(KEY_LEFT_CTRL);
Keyboard.print('s'); //Save
break;
case '2': Keyboard.press(KEY_LEFT_CTRL);
Keyboard.print('r'); //Verify
break;
case '3': Keyboard.press(KEY_LEFT_CTRL);
Keyboard.print('u'); //Upload
break;
case '4': Keyboard.press(KEY_LEFT_CTRL);
Keyboard.press(KEY_LEFT_SHIFT);
Keyboard.print('m'); //Serial Monitor
break;
case '5': Keyboard.press(KEY_LEFT_CTRL); //undo
Keyboard.print('z');
break;
case '6': Keyboard.press(KEY_LEFT_CTRL); //redo
Keyboard.print('y');
break;
case '7': Keyboard.press(KEY_LEFT_CTRL);
Keyboard.press(KEY_LEFT_SHIFT);
Keyboard.print('g'); //Find Previous
break;
case '8': Keyboard.press(KEY_LEFT_CTRL);
Keyboard.print('g'); //Find Next
break;
case '9': Keyboard.press(KEY_LEFT_CTRL);
Keyboard.print('c'); //Copy
break;
case '0': Keyboard.press(KEY_LEFT_CTRL);
Keyboard.print('v'); //Paste
break;
case 'A': Keyboard.press(KEY_LEFT_CTRL);
Keyboard.print('/'); //Comment / Uncomment
break;
case 'B': Keyboard.press(KEY_LEFT_CTRL);
Keyboard.print('f'); // Find
break;
}
delay(100); Keyboard.releaseAll(); // this releases the buttons
}
break;
case 3: //Application 3 MS windows nonsense
LCD_update_3(); //Mode 3 text for LCD
setColorsMode3();
encoderA_Mode3(); // Etch-a-sketch mouse up/down in MSpaint
encoderB_Mode3(); // Etch-a-sketch mouse left/right in MSpaint
if (key) {
//Serial.println(key);
switch (key) {
case '1': //macro example!!! Windows_Key+R = Run then type "mspaint" and press enter. Opens MS Paint
Keyboard.press(KEY_LEFT_GUI);
Keyboard.press('r'); delay(150);
Keyboard.release(KEY_LEFT_GUI);
Keyboard.release('r');
delay(150); //give your system time to catch up with these android-speed keyboard presses
Keyboard.println("mspaint");
break;
case '2':
Keyboard.press(KEY_LEFT_GUI);
Keyboard.press(KEY_LEFT_ARROW); delay(150); //snaps window to left side of screen.
break;
case '3':
Keyboard.press(KEY_LEFT_GUI);
Keyboard.press(KEY_RIGHT_ARROW); delay(150); //snaps window to right side of screen.
break;
case '4':
Keyboard.press(KEY_LEFT_ALT);
Keyboard.press(KEY_F4); delay(150); //Closes active window
break;
case '5': //macro example: Windows_Key+R = Run then type "calc" and press enter. Opens MS Calculator
Keyboard.press(KEY_LEFT_GUI);
Keyboard.press('r'); delay(150);
Keyboard.release(KEY_LEFT_GUI);
Keyboard.release('r');
delay(150); //give your system time to catch up with these android-speed keyboard presses
Keyboard.println("calc");
break;
case '6': //macro example: Windows_Key+R = Run then type "excel" and press enter. Opens MS Excel
Keyboard.press(KEY_LEFT_GUI);
Keyboard.press('r'); delay(150);
Keyboard.release(KEY_LEFT_GUI);
Keyboard.release('r');
delay(150); //give your system time to catch up with these android-speed keyboard presses
Keyboard.println("excel");
break;
case '7': //macro example: Windows_Key+R = Run then type "winword" and press enter. Opens MS Word
Keyboard.press(KEY_LEFT_GUI);
Keyboard.press('r'); delay(150);
Keyboard.release(KEY_LEFT_GUI);
Keyboard.release('r');
delay(150); //give your system time to catch up with these android-speed keyboard presses
Keyboard.println("winword");
break;
case '8': //macro that opens chrome and a random wiki page for learning.
Keyboard.press(KEY_LEFT_GUI);
Keyboard.press('r');
Keyboard.release(KEY_LEFT_GUI);
Keyboard.release('r');
delay(50); //give your system time to catch up with these android-speed keyboard presses
Keyboard.println("chrome"); delay(500);
Keyboard.println("https://en.wikipedia.org/wiki/Special:Random");
break;
case '9': //macro that opens Chrome & Rick Rolls you like a chump
Keyboard.press(KEY_LEFT_GUI);
Keyboard.press('r');
Keyboard.release(KEY_LEFT_GUI);
Keyboard.release('r');
delay(50); //give your system time to catch up with these android-speed keyboard presses
Keyboard.println("chrome"); delay(500);
Keyboard.println("https://www.youtube.com/watch?v=dQw4w9WgXcQ");
break;
case '0': //macro that opens Chrome and goes to my youtube channel!
Keyboard.press(KEY_LEFT_GUI);
Keyboard.press('r');
Keyboard.release(KEY_LEFT_GUI);
Keyboard.release('r');
delay(50); //give your system time to catch up with these android-speed keyboard presses
Keyboard.println("chrome"); delay(500);
Keyboard.println("https://www.youtube.com/c/ryanbatesrbg");
break;
case 'A': //minimize all windows (view desktop)
Keyboard.press(KEY_LEFT_GUI);
Keyboard.press('m');
break;
case 'B':
Keyboard.press(KEY_LEFT_GUI); //Opens Snip-it
Keyboard.release(KEY_LEFT_GUI); delay(25);
Keyboard.println("snip"); //type "snip" and press "return"
break;
}
delay(100); Keyboard.releaseAll(); // this releases the buttons
}
break;
}
delay(1); // delay in between reads for stability
}
//---------------------Sub Routine Section--------------------------------------------------------------------------
void setColorsMode0(){
if (colorUpdate == 0){ // have the neopixels been updated?
for(int i=0;i<NUMPIXELS;i++){ // Red,Green,Blue // pixels.Color takes RGB values; range is (0,0,0) to (255,255,255)
pixels.setPixelColor(i, pixels.Color(150, 0, 0)); // Moderately bright red color.
pixels.show(); // This pushes the updated pixel color to the hardware.
delay(50); } // Delay for a period of time (in milliseconds).
colorUpdate=1; } // Mark the color flag so neopixels are no longer updated in the loop
}
void setColorsMode1(){
if (colorUpdate == 0){ // have the neopixels been updated?
pixels.setPixelColor(0, pixels.Color( 80, 0,200)); //gradient mix
pixels.setPixelColor(1, pixels.Color( 10, 0,200)); //gradient mix
pixels.setPixelColor(2, pixels.Color( 20, 0,200));
pixels.setPixelColor(3, pixels.Color( 40, 0,200));
pixels.setPixelColor(4, pixels.Color( 60, 0,200));
pixels.setPixelColor(5, pixels.Color( 80, 0,200));
pixels.setPixelColor(6, pixels.Color(100, 0,200));
pixels.setPixelColor(7, pixels.Color(120, 0,200));
pixels.setPixelColor(8, pixels.Color(140, 0,200));
pixels.setPixelColor(9, pixels.Color(160, 0,200));
pixels.setPixelColor(10, pixels.Color(180, 0,200));
pixels.setPixelColor(11, pixels.Color(200, 0,200));
pixels.setPixelColor(12, pixels.Color(220, 0,200));
pixels.show();
colorUpdate=1; } // neoPixels have been updated.
// Set the flag to 1; so they are not updated until a Mode change
}
void setColorsMode2(){
if (colorUpdate == 0){ // have the neopixels been updated?
pixels.setPixelColor(0, pixels.Color( 51,102, 0));
pixels.setPixelColor(1, pixels.Color( 0, 0,150));
pixels.setPixelColor(2, pixels.Color( 0,150, 0));
pixels.setPixelColor(3, pixels.Color(150, 0, 0));
pixels.setPixelColor(4, pixels.Color(220, 0,200));
pixels.setPixelColor(5, pixels.Color(150, 0,150));
pixels.setPixelColor(6, pixels.Color(150, 0,150));
pixels.setPixelColor(7, pixels.Color( 80,102, 0));
pixels.setPixelColor(8, pixels.Color( 80,102, 0));
pixels.setPixelColor(9, pixels.Color( 5, 5, 100));
pixels.setPixelColor(10,pixels.Color( 5, 5, 100));
pixels.setPixelColor(11, pixels.Color(102, 5, 0));
pixels.setPixelColor(12, pixels.Color(80,102, 0));
pixels.show(); colorUpdate=1; } // neoPixels have been updated.
// Set the flag to 1; so they are not updated until a Mode change
}
void setColorsMode3(){
if (colorUpdate == 0){ // have the neopixels been updated?
pixels.setPixelColor(0, pixels.Color( 0,150,150)); // cyan
pixels.setPixelColor(1, pixels.Color( 0,150, 0)); // green
pixels.setPixelColor(2, pixels.Color( 0,150,150)); // cyan
pixels.setPixelColor(3, pixels.Color( 0,150, 0)); // green
pixels.setPixelColor(4, pixels.Color( 0,150,150)); // cyan
pixels.setPixelColor(5, pixels.Color( 0,150,150)); // cyan
pixels.setPixelColor(6, pixels.Color( 0,150, 0)); // green
pixels.setPixelColor(7, pixels.Color( 0,150,150)); // cyan
pixels.setPixelColor(8, pixels.Color( 0,150, 0)); // green
pixels.setPixelColor(9, pixels.Color( 0,150, 0)); // green
pixels.setPixelColor(10, pixels.Color( 0,150,150)); // cyan
pixels.setPixelColor(11, pixels.Color( 0,150, 0)); // green
pixels.setPixelColor(12, pixels.Color( 0,150,150)); // cyan
pixels.show(); colorUpdate=1; } // neoPixels have been updated.
// Set the flag to 1; so they are not updated until a Mode change
}
void checkModeButton(){
buttonState = digitalRead(ModeButton);
if (buttonState != lastButtonState) { // compare the buttonState to its previous state
if (buttonState == LOW) { // if the state has changed, increment the counter
// if the current state is LOW then the button cycled:
modePushCounter++;
Serial.println("pressed");
Serial.print("number of button pushes: ");
Serial.println(modePushCounter);
colorUpdate = 0; // set the color change flag ONLY when we know the mode button has been pressed.
// Saves processor resources from updating the neoPixel colors all the time
}
delay(50); // Delay a little bit to avoid bouncing
}
lastButtonState = buttonState; // save the current state as the last state, for next time through the loop
if (modePushCounter >3){ //reset the counter after 4 presses CHANGE THIS FOR MORE MODES
modePushCounter = 0;}
}
void encoderA(){
long newPos = RotaryEncoderA.read()/4; //When the encoder lands on a valley, this is an increment of 4.
if (newPos != positionEncoderA && newPos > positionEncoderA) {
positionEncoderA = newPos;
//Serial.println(positionEncoderA);
Keyboard.press(KEY_LEFT_ARROW);
Keyboard.release(KEY_LEFT_ARROW); }
if (newPos != positionEncoderA && newPos < positionEncoderA) {
positionEncoderA = newPos;
//Serial.println(positionEncoderA);
Keyboard.press(KEY_RIGHT_ARROW);
Keyboard.release(KEY_RIGHT_ARROW); }
}
void encoderB(){
long newPos = RotaryEncoderB.read()/4; //When the encoder lands on a valley, this is an increment of 4.
if (newPos != positionEncoderB && newPos > positionEncoderB) {
positionEncoderB = newPos;
//Serial.println(positionEncoderB);
Keyboard.press(KEY_UP_ARROW);
Keyboard.release(KEY_UP_ARROW); }
if (newPos != positionEncoderB && newPos < positionEncoderB) {
positionEncoderB = newPos;
//Serial.println(positionEncoderB);
Keyboard.press(KEY_DOWN_ARROW);
Keyboard.release(KEY_DOWN_ARROW); }
}
//=============== encoder definitions/assignments ===========================================
//this section allows a unique encoder function for each mode (profile). Four total in this case or modes 0 through 3.
//=============Encoder A & B Function ====== Set 0 =========================================================
void encoderA_Mode0(){
long newPos = RotaryEncoderA.read()/4; //When the encoder lands on a valley, this is an increment of 4.
// your encoder might be different (divide by 2) i dunno.
if (newPos != positionEncoderA && newPos > positionEncoderA) {
positionEncoderA = newPos;
Keyboard.press(KEY_RIGHT_ARROW);
Keyboard.release(KEY_RIGHT_ARROW); }
if (newPos != positionEncoderA && newPos < positionEncoderA) {
positionEncoderA = newPos;
Keyboard.press(KEY_LEFT_ARROW);
Keyboard.release(KEY_LEFT_ARROW); }
}
void encoderB_Mode0(){
long newPos = RotaryEncoderB.read()/4;
if (newPos != positionEncoderB && newPos > positionEncoderB) {
positionEncoderB = newPos;
Keyboard.press(KEY_DOWN_ARROW);
Keyboard.release(KEY_DOWN_ARROW); }
if (newPos != positionEncoderB && newPos < positionEncoderB) {
positionEncoderB = newPos;
Keyboard.press(KEY_UP_ARROW);
Keyboard.release(KEY_UP_ARROW); }
}
//=============Encoder A & B Function ====== Set 1 =========================================================
void encoderA_Mode1(){
long newPos = RotaryEncoderA.read()/2;
if (newPos != positionEncoderA && newPos < positionEncoderA) {
positionEncoderA = newPos;
//tab increase
Keyboard.write(9); //tab key
}
if (newPos != positionEncoderA && newPos > positionEncoderA) {
positionEncoderA = newPos;
//tab decrease
Keyboard.press(KEY_LEFT_SHIFT);
Keyboard.write(9); //tab key
Keyboard.release(KEY_LEFT_SHIFT); }
}
void encoderB_Mode1(){
long newPos = RotaryEncoderB.read()/2;
if (newPos != positionEncoderB && newPos < positionEncoderB) {
positionEncoderB = newPos;
//Font decrease | Arduino IDE
Keyboard.press(KEY_LEFT_CTRL);
Keyboard.press('-');
Keyboard.release('-'); Keyboard.release(KEY_LEFT_CTRL); }
if (newPos != positionEncoderB && newPos > positionEncoderB) {
positionEncoderB = newPos;
//Font increase | Arduino IDE
Keyboard.press(KEY_LEFT_CTRL);
Keyboard.press('=');
Keyboard.release('='); Keyboard.release(KEY_LEFT_CTRL); }
}
//=============Encoder A & B Function ====== Set 2 =========================================================
void encoderA_Mode2(){ //testing some encoder wheel pay control for arcade games; centede, tempest...
long newPos = RotaryEncoderA.read()/2;
if (newPos != positionEncoderA && newPos > positionEncoderA) {
positionEncoderA = newPos;
//Serial.println(mouseMove);
Mouse.move(-mouseMove,0,0); //moves mouse right... Mouse.move(x, y, wheel) range is -128 to +127
}
if (newPos != positionEncoderA && newPos < positionEncoderA) {
positionEncoderA = newPos;
Mouse.move(mouseMove,0,0); //moves mouse left... Mouse.move(x, y, wheel) range is -128 to +127
}
}
void encoderB_Mode2(){
long newPos = RotaryEncoderB.read()/2; //When the encoder lands on a valley, this is an increment of 2.
if (newPos != positionEncoderB && newPos < positionEncoderB) {
positionEncoderB = newPos;
Mouse.move(0,-mouseMove,0); }
if (newPos != positionEncoderB && newPos > positionEncoderB) {
positionEncoderB = newPos;
Mouse.move(0,mouseMove,0);
}
}
//=============Encoder A & B Function ====== Set 3 =========================================================
void encoderA_Mode3(){
long newPos = RotaryEncoderA.read()/2;
if (newPos != positionEncoderA && newPos > positionEncoderA) {
positionEncoderA = newPos;
Mouse.press(MOUSE_LEFT); //holds down the mouse left click
Mouse.move(0,4,0); //moves mouse down... Mouse.move(x, y, wheel) range is -128 to +127
Mouse.release(MOUSE_LEFT); //releases mouse left click
}
if (newPos != positionEncoderA && newPos < positionEncoderA) {
positionEncoderA = newPos;
Mouse.press(MOUSE_LEFT); //holds down the mouse left click
Mouse.move(0,-4,0); //moves mouse up... Mouse.move(x, y, wheel) range is -128 to +127
Mouse.release(MOUSE_LEFT); //releases mouse left click
}
}
void encoderB_Mode3(){
long newPos = RotaryEncoderB.read()/2;
if (newPos != positionEncoderB && newPos > positionEncoderB) {
positionEncoderB = newPos;
Mouse.press(MOUSE_LEFT); //holds down the mouse left click
Mouse.move(-4,0,0); //moves mouse left... Mouse.move(x, y, wheel) range is -128 to +127
Mouse.release(MOUSE_LEFT); //releases mouse left click
}
if (newPos != positionEncoderB && newPos < positionEncoderB) {
positionEncoderB = newPos;
Mouse.press(MOUSE_LEFT); //holds down the mouse left click
Mouse.move(4,0,0); //moves mouse right... Mouse.move(x, y, wheel) range is -128 to +127
Mouse.release(MOUSE_LEFT); //releases mouse left click
}
}
void LCD_update_0() { //This method is less heavy on tying up the arduino cycles to update the LCD; instead
//this updates the LCD every 3 seconds. If you put the LCD.write commands
//in the key function loops, this breaks the 'feel' and responsiveness of the keys.
//This subroutine that runs infrequently helps the keypad function with decent response.
unsigned long currentMillis = millis();
//================= a note about this cycle, this follows the example sketch "Blink without Delay"===============
if (currentMillis - previousMillis >= 3000) { // if the elasped time greater than 3 seconds
previousMillis = currentMillis; // save the last time you checked the interval
switch (updateLCD_flag) {
case 0:
lcd.clear();
lcd.setCursor(0, 0); lcd.print("1: END ZOOM CALL");
lcd.setCursor(0, 1); lcd.print("2: END ZOOM CALL");
lcd.setCursor(0, 2); lcd.print("3: END ZOOM CALL");
lcd.setCursor(0, 3); lcd.print("4: END ZOOM CALL");
updateLCD_flag = 1;
break;
case 1:
lcd.clear();
lcd.setCursor(0, 0); lcd.print("5: END ZOOM CALL");
lcd.setCursor(0, 1); lcd.print("6: END ZOOM CALL");
lcd.setCursor(0, 2); lcd.print("7: END ZOOM CALL");
lcd.setCursor(0, 3); lcd.print("8: END ZOOM CALL");
updateLCD_flag = 2;
break;
case 2:
lcd.clear();
lcd.setCursor(0, 0); lcd.print(" 9: END ZOOM CALL");
lcd.setCursor(0, 1); lcd.print("10: END ZOOM CALL");
lcd.setCursor(0, 2); lcd.print("11: END ZOOM CALL");
lcd.setCursor(0, 3); lcd.print("12: END ZOOM CALL");
updateLCD_flag = 0;
break;
}}}
void LCD_update_1() {
unsigned long currentMillis = millis();
if (currentMillis - previousMillis >= 3000) { // if the elasped time greater than 3 seconds
previousMillis = currentMillis; // save the last time you checked the interval
switch (updateLCD_flag) {
case 0:
lcd.clear();
lcd.setCursor(0, 0); lcd.print("1: nice shot");
lcd.setCursor(0, 1); lcd.print("2: great pass");
lcd.setCursor(0, 2); lcd.print("3: great save");
lcd.setCursor(0, 3); lcd.print("4: thanks");
updateLCD_flag = 1;
break;
case 1:
lcd.clear();
lcd.setCursor(0, 0); lcd.print("5: i got it");
lcd.setCursor(0, 1); lcd.print("6: take the shot");
lcd.setCursor(0, 2); lcd.print("7: defending");
lcd.setCursor(0, 3); lcd.print("8: go for it");
updateLCD_flag = 2;
break;
case 2:
lcd.clear();
lcd.setCursor(0, 0); lcd.print(" 9: oh no!");
lcd.setCursor(0, 1); lcd.print("10: no problem");
lcd.setCursor(0, 2); lcd.print("11: whoops");
lcd.setCursor(0, 3); lcd.print("12: #@!%*");
updateLCD_flag = 0;
break;
}}}
void LCD_update_2() {
unsigned long currentMillis = millis();
if (currentMillis - previousMillis >= 3000) { //if the elasped time greater than 3 seconds
previousMillis = currentMillis; // save the last time you checked the interval
switch (updateLCD_flag) {
case 0:
lcd.clear();
lcd.setCursor(0, 0); lcd.print("1: New & Improved!");
lcd.setCursor(0, 1); lcd.print("2: Arduino ProMicro");
lcd.setCursor(0, 2); lcd.print("3: Macro Keyboard");
lcd.setCursor(0, 3); lcd.print("4: --Version 2.0--");
updateLCD_flag = 1;
break;
case 1:
lcd.clear();
lcd.setCursor(0, 0); lcd.print("5: Undo");
lcd.setCursor(0, 1); lcd.print("6: Redo");
lcd.setCursor(0, 2); lcd.print("7: Find Previous");
lcd.setCursor(0, 3); lcd.print("8: Find Next");
updateLCD_flag = 2;
break;
case 2:
lcd.clear();
lcd.setCursor(0, 0); lcd.print(" 9: Copy");
lcd.setCursor(0, 1); lcd.print("10: Paste");
lcd.setCursor(0, 2); lcd.print("11: Comment/ UnComm");
lcd.setCursor(0, 3); lcd.print("12: Find");
updateLCD_flag = 0;
break;
}}}
void LCD_update_3() {
unsigned long currentMillis = millis();
if (currentMillis - previousMillis >= 3000) { //if the elasped time greater than 3 seconds
previousMillis = currentMillis;
switch (updateLCD_flag) {
case 0:
lcd.clear();
lcd.setCursor(0, 0); lcd.print("1: MS Paint & Mouse L/R");
lcd.setCursor(0, 1); lcd.print("2: window snap <-");
lcd.setCursor(0, 2); lcd.print("3: window snap ->");
lcd.setCursor(0, 3); lcd.print("4: Alt+F4");
updateLCD_flag = 1;
break;
case 1:
lcd.clear();
lcd.setCursor(0, 0); lcd.print("5: Calculator");
lcd.setCursor(0, 1); lcd.print("6: Excel");
lcd.setCursor(0, 2); lcd.print("7: Word");
lcd.setCursor(0, 3); lcd.print("8: Random Wiki");
updateLCD_flag = 2;
break;
case 2:
lcd.clear();
lcd.setCursor(0, 0); lcd.print(" 9: lolz");
lcd.setCursor(0, 1); lcd.print("10: Ryan's Youtube");
lcd.setCursor(0, 2); lcd.print("11: Minimize all");
lcd.setCursor(0, 3); lcd.print("12: Snip-it");
updateLCD_flag = 0;
break;
}}}
void endZoomCall(){ // QUITS YOUR ZOOM CALL FULL STOP.
Keyboard.press(KEY_LEFT_ALT);
Keyboard.print('q'); delay(350);
Keyboard.release(KEY_LEFT_ALT); delay(50);
Keyboard.write(9); //tab key in ASCII decimal
delay(350);
Keyboard.press(KEY_RETURN);
}
© 2013-2023 Ryan Bates and © 2013-2023 Retro Built Games, LLC. All photos, designs, documents, and graphics (C) Ryan Bates. All Rights Reserved.
This site is best viewed on a desktop PC. Raspberry Pi is a trademark of the Raspberry Pi Foundation. ARDUINO® and other Arduino brands and logos published in the website are Trademarks of Arduino AG.